Design Converter
- Technologies

Flutter

React

Shopify
Flutter
React
Shopify
- Resource

Discord
Discord
Design Converter
Flutter
React
Shopify
Flutter
React
Shopify
Discord
Discord
Education
Last updated on Mar 11, 2025
•13 mins read
Last updated on Mar 10, 2025
•13 mins read
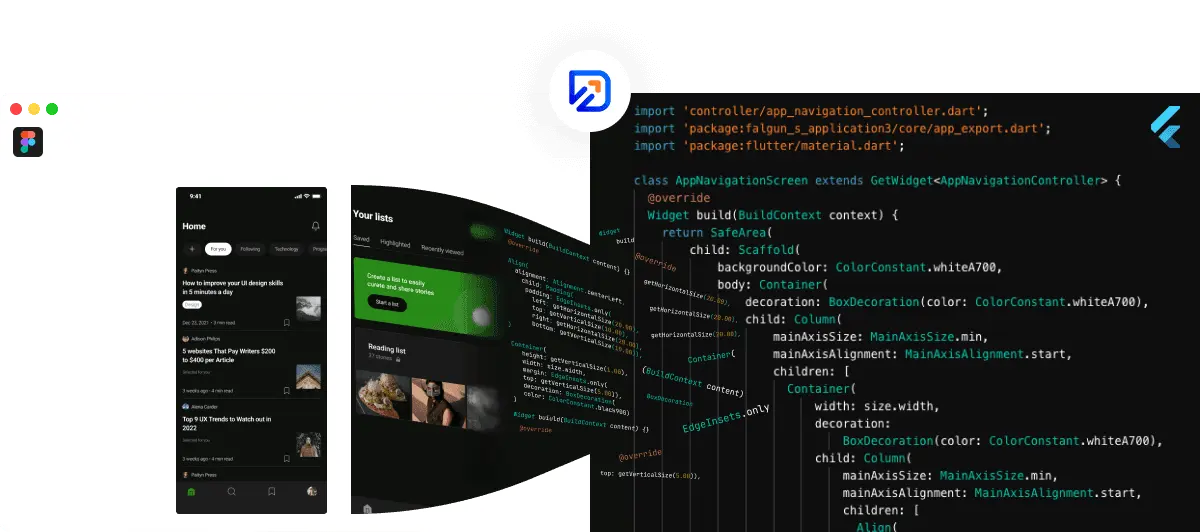

Summary: Want to make your design to code handoff smooth? Learn how to convert your Figma design to Flutter code using DhiWise Design Converter. Understand more about the Figma and Flutter technology and Figma to Flutter conversion with our step-by-step guide.
Today for every organization building an exclusive app has become indispensable. To reach out to potential customers, businesses are making huge investments in mobile app development as the number of mobile app users is consistently growing worldwide.
However, building a successful mobile application isn’t a cakewalk; there are multiple things you need to consider during app development, such as planning, designing, coding, testing, and maintenance.
Among them, converting your design to code is the most frustrating and time-consuming task for developers unfamiliar with the design world.
Figma is a popular web-based vector graphics editor and prototyping tool. It comes with additional functionalities supported by desktop applications for macOS and Windows.
It allows mobile users to view Figma prototypes in real time using Figma mirror companion apps for Android and iOS. It enables designers and developers to create UI and wireframing for web and mobile apps.
Flutter is an open-source Google UI toolkit to develop beautiful, natively compiled apps for Android, iOS, Linux, Mac, Windows, Google Fuchsia, and the web from a single codebase.
Flutter is among the top software repositories. Based on the GitHub stars. There are over 100,000 apps scripted using Flutter since its first launch. One of the most notable apps is Xianyu, created by the Alibaba team, which has 50 million people using it.
Though translating UI/UX design to Flutter is one of the frustrating and time-consuming parts of app development, DhiWise helps you to bridge the gap between designing and development with its Design Converter.
It enables developers to convert Figma design to responsive Flutter code in a few steps.
Let’s learn how to translate the beautiful Figma design into an excellent Flutter app code with Design Converter.
Here is the step-by-step guide to generating Flutter code:
To convert your Figma design to Flutter code, you first need to sign up for DhiWise. You can directly sign up with Google, Microsoft, or with a preferred Email ID.
 Sign Up
Once the account is created, you will be directed to the Dashboard, where you can view and search the created applications, select templates, and explore screens for web and mobile apps.
To create a new mobile app, click Mobile App, where you can create mobile applications using Flutter, Android, iOS, and React Native frameworks.
 Create New Mobile App
Once you select Mobile App it will navigate you to the next screen where you can upload Figma design and convert it into the interactive code. Click Bring Your Designs to Life button to convert your Figma designs to code.
 Upload Your Figma Design
This will open a Create a new app window where you need to define the core attributes of your application including Application name, Framework, Code Generation Scope, Figma Account, and the Figma file URL to start creating your app.
To access the Figma design in DhiWise, you would have to attach a Figma account of yours by clicking on Connect your Figma account, and then you need to provide the Figma URL .
 Define Core Attributes
These features in Design Converter enable you to select design screens of your choice and set up app configuration.
Once you fill in all the details for your app click Start Building. A new window will appear where you can select the app screens using which you want to create an app from the Figma URL you provided.
 Select Screens You Want to Import
Select the screens you want to import and click Confirm Selection.
Next, you can configure the essential components of your application such as the Package name, Bundle ID, and app icon in the Application setup. After updating the changes, click Save & Continue.
 Setup Application
Note: Your application can also be configured later from the “Settings” option.
Next, you can configure your application’s foundational elements such as State management library, Flutter version and Dynamic code configuration.
If you wish to go with state management support , Design converter provides inbuilt support for the popular GetX , Provider , Riverpod , and BLoC libraries or you can also generate the UI code with stateless widgets for your app design. After updating the changes, click Save & Continue.
 Code Configuration
And DhiWise magic begins here! DhiWise will start fetching all the design resources from the Figma design file, as shown below.
 Fetch Figma Design Resources
During the process, the design resources are fetched, scanned, and UI components are identified. As a result, you will get auto-identified widgets, custom widgets, auto-setup actions, and validations from your provided design file.
 Auto Identified Widgets
From here you can easily set up the initial screen of the application and the screen to be opened after the splash screen.
Select the splash screen and click Next step.
 Set up Splash Screen
Select the screen next to the splash screen and click Submit to proceed.
 Set up Screen Next to Splash Screen
From here you can proceed to the screen list.
On the Screens, you will see all the selected screens from your app design. To customize them, click Configure. The Configure option allows you to customize the UI, set actions on widgets, and edit styling.
 Select and customize App Screens
Design Converter provides a Smart Code Editor that allows you to edit Screen UI similar to an IDE. You can view the auto-identified actions, add new actions, and set up the onReady lifecycle method from here.
 Customize Screen UI
Here is how you can set up onClick action on the button.
 Setup onClick Action
You can set up different actions like Navigation, API integration, Authentication, Permissions, and more as shown in the following snippet.
 Setup More Actions
Here is how you can set up the onReady lifecycle method.
 Setup onReady Lifecycle Method
The Styling option lets you update primary theme, add secondary theme, and create new color styles.
 Customize Styling
In case you encounter any Figma design changes in the middle of UI customization, and want to bring those changes in DhiWise, they can easily be synchronized without affecting the UI using the Sync design changes option.
 Sync Figma Design Changes
Next, you can integrate APIs to set up connections with the server. The platform lets you add, view, edit, and delete the APIs.
 Integrate API
To add a new API, you can either upload a Postman file from the existing Postman collection or create and add API manually with DhiWise API Runner.
The API integration option in DhiWise lets you upload Postman or Swagger files or URLs to import APIs for your application.
 Import Postman, or Swagger File
If you don’t have any Postman Collection or Swagger file DhiWise Flutter Builder allows you to create a new API with its API Runner as shown below.
 Create New API
DhiWise simplifies adding constants to your code. It allows you to create and manage multiple constant files in the app.
 Add Constants
Once you have done with the UI customization and styling, the changes can be previewed before generating the final code, also there is a facility to Copy link and share the preview with others in your team.
 Preview Design Changes
Once your UI customization is done such as adding actions, setting up APIs, and more, you are ready to generate your app code.
With the platform, you can either generate code for single or multiple screens or build the entire app with the Build app option.
 Export Code For Single or Multiple Screens
The Build app option allows you to generate the Flutter code in a few minutes. Once you proceed, you will get the structured Flutter application code, with the following SDK version and the libraries.
 Build App
The platform generates clean code with reusable code components following a clean code structure. A code view will open as your app code is generated where you can preview your app design by clicking Run, and download your app code as ZIP with Sync or Download code. Also, see the version of your code, the last build version, and the chosen code type under Code Summary.
 Code Summary, Sync or Download Code
When you run the preview, you can check all your app screens and verify your screens on different devices.
 Preview All Screens
To download the entire source code from the platform click Sync or Download code. And boom🎉 your job is done!

The platform comes with GitHub or GitLab integration as well as extensions for your favorite IDEs i.e., VS Code, Android Studio, and IntelliJ simplifying code sharing, collaboration, and management all from one place.
To sync the generated code with GitHub or GitLab repositories, go to the Integration option under Settings, here you can select a repository to sync code.
 GitHub and GitLab Integration
To sync code with VScode , Android Studio, and IntelliJ IDEA , install the plugin in your IDE and then copy-paste the application token into the plugin.
 Download Code in Your IDE
And that’s how your entire app can be created in just a few steps with all the functionalities you need! Refer to DhiWise Docs to learn how you can achieve more using DhiWise to start building your amazing app.
DhiWise provides two more awesome features for its developers to make their development life exciting.
Ready-to-use Flutter templates ; and the other is Figma to Code plugin that lets you get the code from your Figma platform in minutes.
And don’t forget about WiseGPT (Coding Assistant), And don’t forget about WiseGPT (Coding Assistant)—DhiWise’s powerful AI-driven coding partner that analyzes your entire codebase to generate production-ready, context-aware code without the need for prompts!
With WiseGPT, say goodbye to repetitive coding and complex API struggles. It ensures seamless multi-file updates, real-time inline suggestions, and built-in best practices to keep your code clean, scalable, and efficient. Plus, its intelligent debugging and test case automation help you deliver high-quality software faster.
WiseGPT takes care of the mundane tasks, freeing you to focus on the creative and innovative aspects of development.
Looks amazing right?
So, this is all about converting your design in Figma to Flutter code using DhiWise Flutter Builder. It will only take a few steps to transform the Figma design into Flutter code.
Visit the official Flutter Builder page to stay updated with the latest features.
